Feeling that familiar pinch or stiffness in the front of your hips after sitting for hours or finishing a tough workout? You're not alone. Tight hip flexors have become a common ailment, contributing to everything from nagging low back pain to reduced athletic performance. But what really causes this tightness, and more importantly, what are the most effective ways to address it? Is it just about stretching, or is there more to the story?
This guide moves beyond generic advice to provide a detailed, evidence-informed roundup of the 8 best stretches for tight hip flexors, curated with insights from the clinical experts at Highbar Physical Therapy. We'll explore why your hips get tight in the first place, touching on anatomy, posture, and muscle imbalances. To truly find lasting relief and get back to living better, it's important to understand the underlying issues, such as what causes hip pain when sleeping, which can often be exacerbated by tight hip flexors.
This article sets the stage for a complete plan that doesn't just provide temporary relief but empowers you to move freely and live a fuller life. We will break down not just the 'what,' but the critical 'how,' 'when,' and 'why' for each technique, including:
- Proper form and execution for maximum benefit.
- Dosage: How long to hold, how many reps, and how often to perform each stretch.
- Common mistakes to avoid so you don't cause more harm.
- Modifications to make stretches easier or more challenging.
By the end, you will have a safe and powerful toolkit for lasting hip mobility. You'll also understand when to seek professional guidance and how Highbar's passion for getting people better and living fuller lives can guide you back to feeling your best.
1. 90/90 Hip Flexor Stretch
The 90/90 Hip Flexor Stretch is a cornerstone in physical therapy for effectively targeting and lengthening the muscles at the front of your hip. Its name comes from the two 90-degree angles formed by your legs, a specific position that isolates key hip flexor muscles like the iliopsoas and rectus femoris. This stretch is fundamental for anyone who sits for long periods, as it directly counteracts the hip-shortening effects of a desk job, driving, or prolonged screen time, helping you move more freely in your daily life.
By stabilizing the pelvis with a posterior tilt (tucking your tailbone under), you can achieve a deeper and more precise stretch without compensating through your lower back. This makes it one of the best stretches for tight hip flexors because it is both safe and powerful when performed correctly. Its widespread use in clinical settings—from post-surgical rehabilitation to helping office workers overcome back pain—highlights its reliability and effectiveness in getting you back to feeling good.
How to Perform the 90/90 Hip Flexor Stretch
- Get into Position: Start by kneeling on a soft surface, like a yoga mat or folded towel. Step one foot forward so your front knee is bent at a 90-degree angle, directly over your ankle.
- Align Your Back Leg: Your back knee should also be bent at 90 degrees, resting on the ground directly below your hip. Your back shin should be parallel to your front thigh.
- Engage Your Core and Glutes: Before leaning, gently tuck your tailbone under by squeezing the glute of your back leg. This creates a posterior pelvic tilt, which is critical for isolating the hip flexor. You may already feel a stretch at the front of your back hip.
- Initiate the Stretch: Keeping your torso upright and your core engaged, slowly shift your hips forward. Only move as far as you can without arching your lower back.
- Hold and Breathe: Hold the stretch for 30-60 seconds, breathing deeply to help your muscles relax. Avoid pushing into pain.
Key Insight: The most common mistake is arching the lower back and letting the pelvis tilt forward. Squeezing your glute on the back leg is the secret to maintaining a neutral pelvis and getting a true hip flexor stretch, not just a back bend.
How Often Should You Do It?
For optimal results, perform 2-3 repetitions on each side, holding each for 30-60 seconds. You can incorporate this stretch into your daily routine, especially after long periods of sitting or as part of a warm-up before a workout. Consistency is more important than intensity.
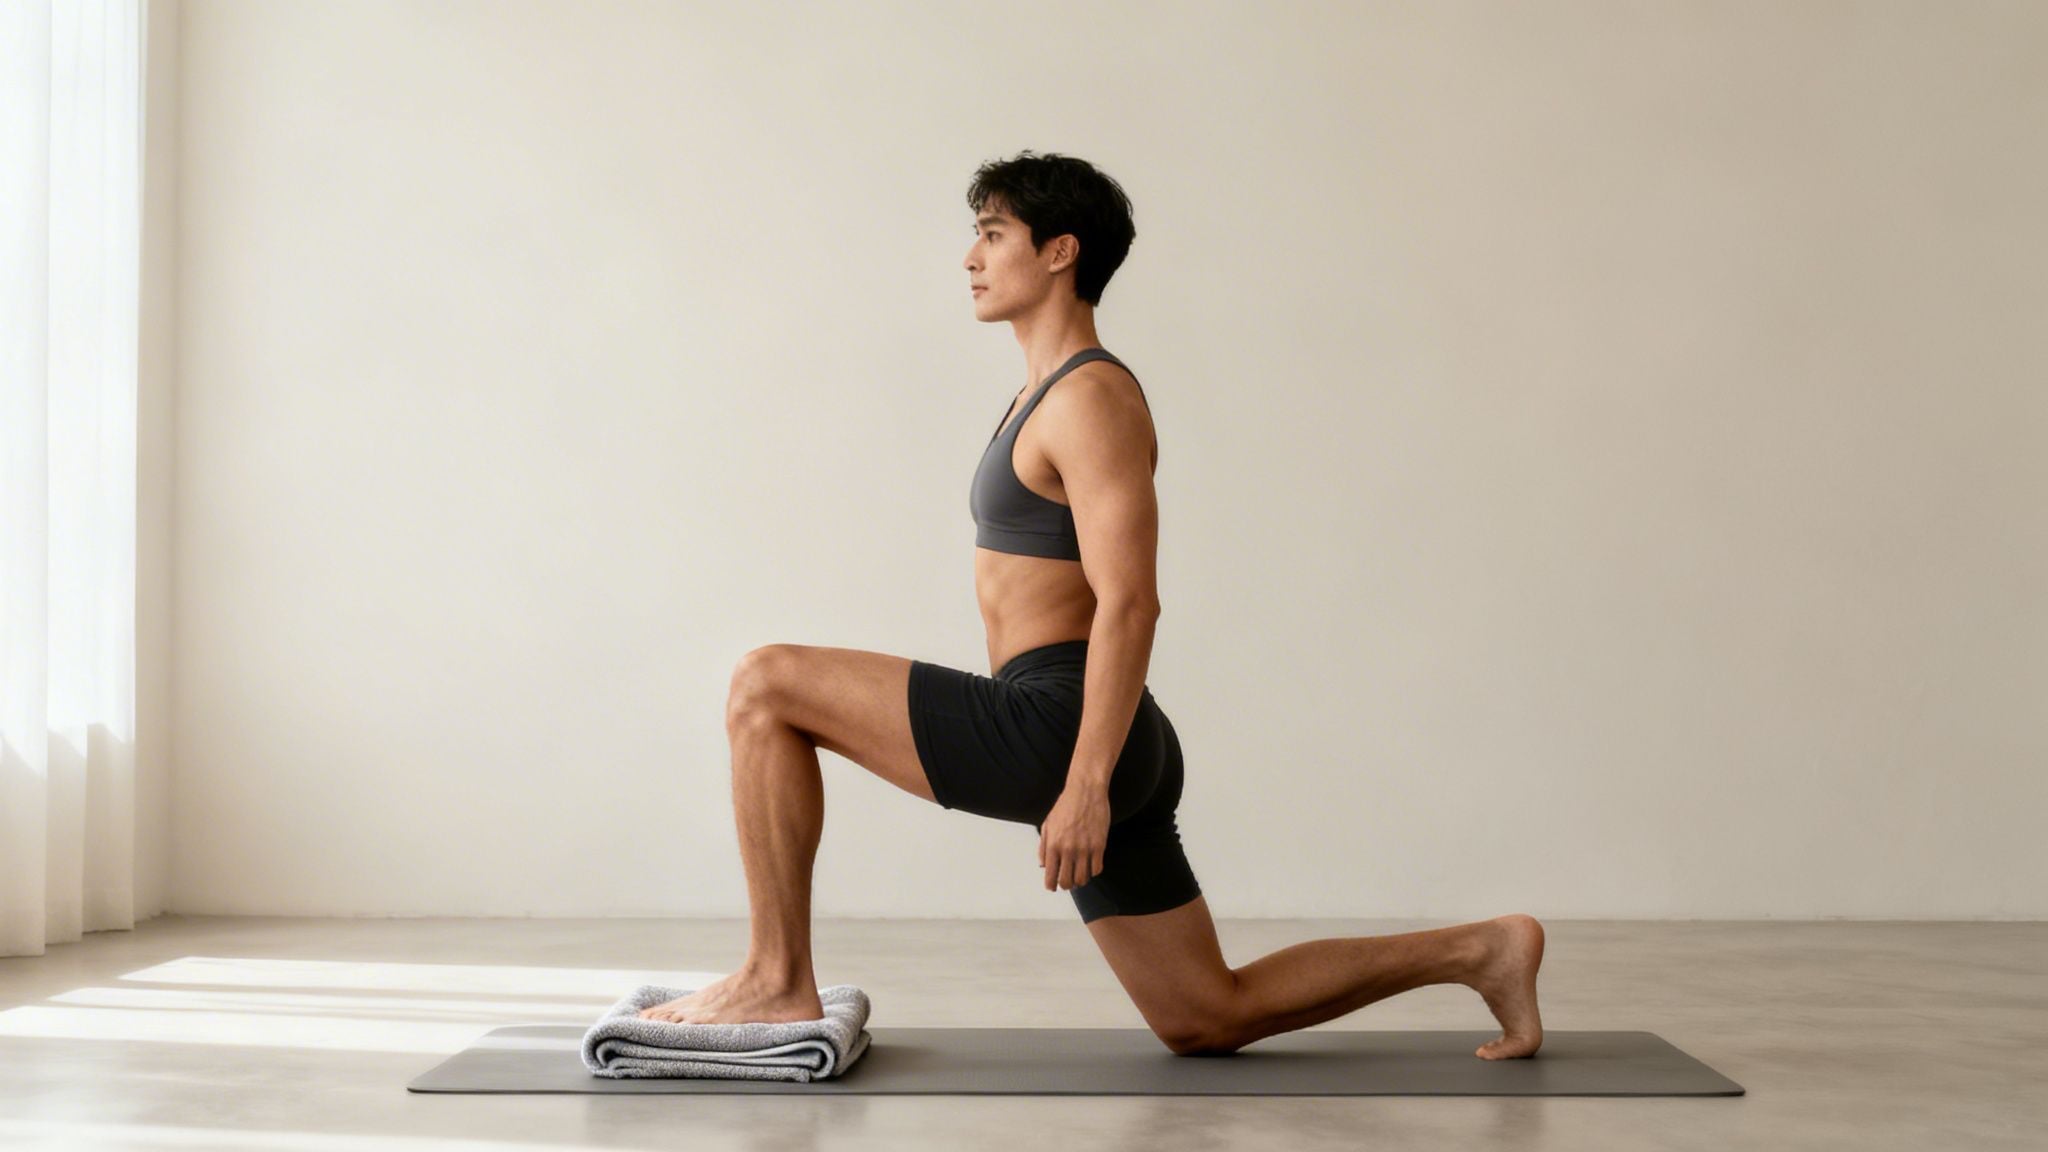
2. Kneeling Hip Flexor Stretch (Half-Kneeling Lunge)
The Kneeling Hip Flexor Stretch, often called a half-kneeling lunge, is a foundational exercise used by physical therapists to help people regain pain-free movement and improve flexibility at the front of the hip. This position powerfully targets the psoas, iliacus, and rectus femoris muscles of the back leg. Because it mirrors functional movements like walking and getting up from a chair, it is particularly effective for improving general mobility and reducing lower back strain.
This stretch is a staple in various rehabilitation and training settings, from helping people recover from hip surgery to standard warm-ups for weekend warriors and runners. Its value lies in its ability to be easily modified for different flexibility levels. By consciously engaging the glutes to stabilize the pelvis, you prevent compensation from the lower back, ensuring the stretch is directed squarely at the intended muscles. This makes it one of the best stretches for tight hip flexors because it is both accessible for beginners and effective for seasoned athletes.
How to Perform the Kneeling Hip Flexor Stretch
- Set Up Your Position: Begin in a half-kneeling stance on a comfortable surface, placing a padded mat or folded towel under your back knee. Step one foot forward so your front knee is bent and positioned directly over your ankle.
- Align Your Torso and Pelvis: Keep your torso upright and your shoulders stacked over your hips. Before you initiate the stretch, engage the glute on your back leg to gently tuck your pelvis under. This posterior tilt is crucial.
- Create the Stretch: While maintaining an upright posture, slowly press your hips forward. You should feel a distinct pull along the front of your hip and thigh on the back leg. Avoid leaning forward or arching your back.
- Add an Optional Reach: For a deeper stretch through the connected fascia, raise the arm on the same side as your back leg straight up toward the ceiling. You can add a slight side-bend away from the stretching hip to increase intensity.
- Hold and Repeat: Hold the position for 30-45 seconds while breathing steadily. Release the stretch and switch sides.
Key Insight: Resisting the urge to lean your torso forward is critical. The stretch comes from the forward shift of your hips while your trunk remains vertical. Keeping your core engaged and your back straight ensures the focus stays on the hip flexor.
How Often Should You Do It?
Aim to complete 2-3 repetitions on each leg, holding each stretch for 30-45 seconds. This exercise is perfect for a post-workout cool-down, a break from sitting at your desk, or as part of a dynamic warm-up. At Highbar Physical Therapy, we often prescribe this stretch to help patients regain mobility and live fuller lives by directly addressing the muscular imbalances caused by modern lifestyles.
3. Pigeon Pose (Eka Pada Rajakapotasana Prep)
Pigeon Pose is a yoga-derived position celebrated for its deep hip-opening benefits. Though it originates in hatha yoga traditions, it is now widely used in physical therapy and athletic recovery for its ability to target multiple muscle groups at once. It primarily stretches the hip external rotators like the piriformis and gluteus medius, but when performed with a forward fold, it also addresses the hip flexors of the back leg, making it a multifaceted tool for improving mobility.

Its inclusion in post-running recovery protocols and physical therapy plans for conditions like piriformis syndrome highlights its clinical value. By creating external rotation in the front hip and extension in the back hip, Pigeon Pose is one of the best stretches for tight hip flexors because it simultaneously addresses rotation and extension deficits. This dual action helps restore balanced movement, which is essential for living a fuller, more active life.
How to Perform the Pigeon Pose
- Get into Position: Start on all fours (tabletop position) on a yoga mat. Bring your right knee forward and place it on the mat behind your right wrist.
- Angle Your Front Shin: Angle your right shin so your right foot is somewhere in front of your left hip. The closer your foot is to your hands, the more intense the stretch will be. Keep your front ankle flexed to protect the knee joint.
- Extend Your Back Leg: Slide your left leg straight back, keeping your hips square to the front of the mat. Check that your back leg is straight and not angled out to the side. Both of your "sit bones" should feel evenly weighted toward the floor.
- Initiate the Stretch: Keeping a long spine, you can stay upright on your hands or slowly walk your hands forward to lower your torso over your front shin.
- Hold and Breathe: Hold the stretch for 60-90 seconds, breathing deeply into the sensation. If you feel any sharp pain, especially in your knee, ease out of the stretch immediately.
Key Insight: The goal is not to get your front shin parallel to the front of the mat. Forcing this position can injure your knee. Instead, focus on keeping your hips square and only bringing your shin as far forward as your flexibility allows without pain.
How Often Should You Do It?
Perform 1-2 repetitions on each side, holding each for a longer duration of 60-90 seconds to allow the connective tissues to release. For best results, practice this stretch 3-4 times per week, particularly after workouts or as part of a dedicated mobility routine.
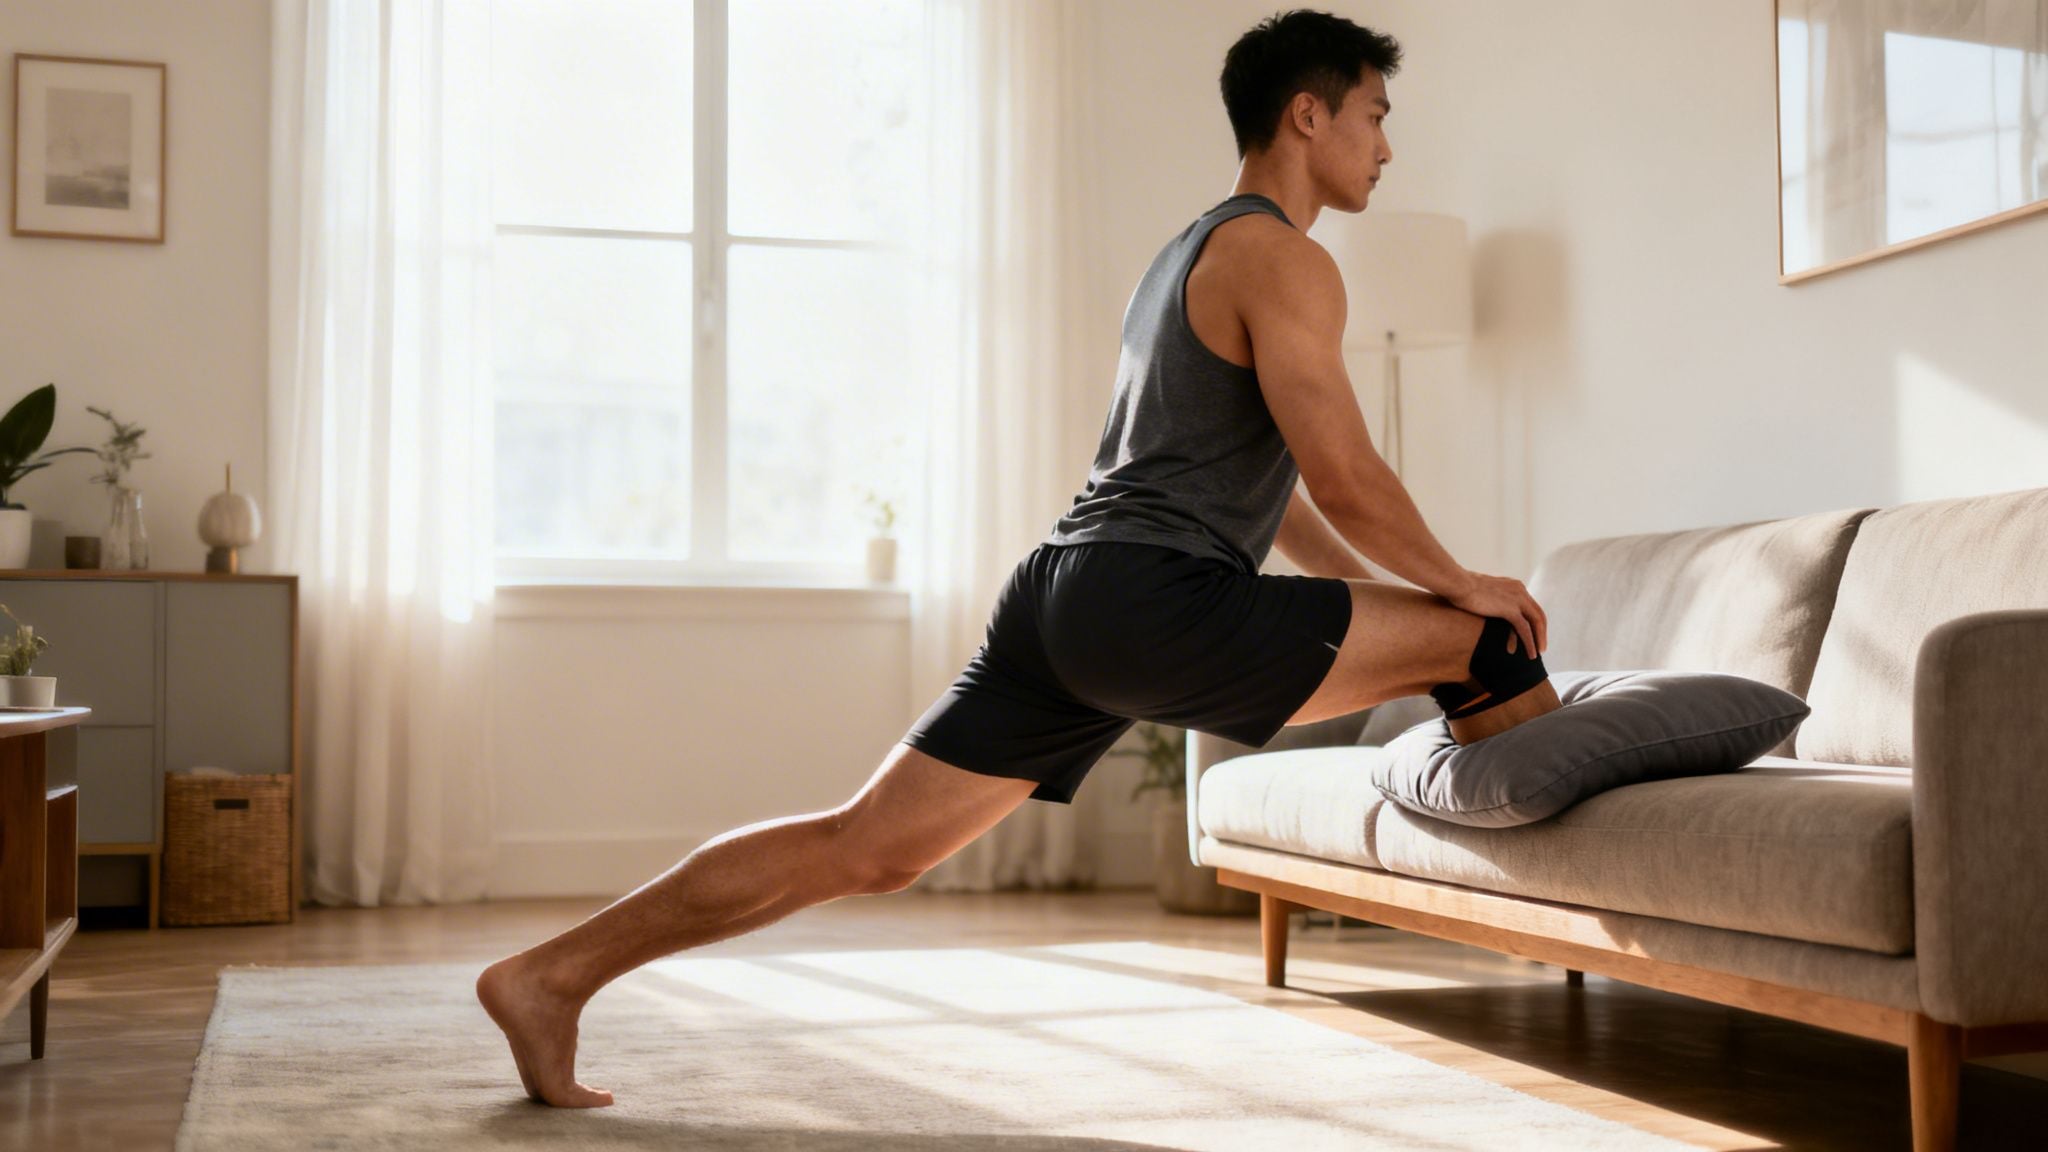
4. Couch Stretch (Deep Hip Flexor Stretch with Elevation)
The Couch Stretch, popularized within functional fitness and mobility circles, is a powerful technique for addressing deep-seated hip flexor tightness. By elevating the back leg on a couch, bench, or chair, this stretch dramatically increases the tension on the rectus femoris (a quad muscle that also flexes the hip) and the iliopsoas. This elevation creates a more intense and effective stretch than many floor-based variations, making it one of the best stretches for tight hip flexors for athletes and individuals with significant mobility restrictions.
This stretch is a staple in CrossFit boxes and among dedicated runners because it directly targets the hip extension limitations that can hinder performance and contribute to lower back pain. By isolating the front of the hip with added gravitational pull from the elevated leg, it helps restore the proper length-tension relationship in the muscles. It's an excellent tool for those looking to advance their stretching routine and achieve a deeper release, helping them get back to their activities with better movement.
How to Perform the Couch Stretch
- Set Up Your Position: Place a pad or pillow on the floor in front of a sturdy couch, chair, or bench for knee comfort. Kneel on the pad with the couch behind you.
- Elevate Your Back Leg: Carefully slide your back leg up so your knee is in the corner where the couch cushion meets the backrest. The top of your foot and shin should rest against the vertical part of the couch.
- Step Forward: Bring your other foot forward, planting it firmly on the floor so your front knee is bent at roughly 90 degrees. Start with your torso leaning forward, using your hands on the floor or front knee for support.
- Engage and Rise: Squeeze the glute of your back leg and engage your core. Slowly raise your torso to an upright position, keeping your pelvis tucked. You should feel an intense stretch in the front of your elevated leg's hip and thigh.
- Hold the Stretch: Breathe deeply and hold this position for 45-60 seconds. Do not force the stretch or allow your lower back to arch excessively.
Key Insight: The goal is not to force your torso perfectly upright immediately. The key is to maintain a posterior pelvic tilt by squeezing your back glute. This prevents you from compensating with your lower back and ensures the stretch is focused on the hip flexor and quadriceps.
How Often Should You Do It?
For significant mobility improvements, perform 2-3 sets on each leg, holding for 45-60 seconds. You can do this stretch daily or on alternating days, especially after workouts or long periods of sitting. If the intensity is too high, start with a lower elevation, like an ottoman, and gradually work your way up.
5. Active Isolated Stretching (AIS) for Hip Flexors
Active Isolated Stretching (AIS) is a dynamic stretching method that works with your body's natural reflexes to improve flexibility. This technique involves short, targeted stretches held for only two to three seconds. Instead of a long, passive hold, AIS uses active engagement of the opposing muscle group to relax the target muscle, a process known as reciprocal inhibition. This makes it one of the best stretches for tight hip flexors because it promotes gains in flexibility without triggering the protective stretch reflex that can cause muscles to tighten up.
The AIS approach is widely used in sports medicine and physical therapy clinics to help patients achieve safe and effective mobility gains. By contracting the glutes (hip extensors), you signal the hip flexors to relax, allowing for a deeper and more controlled stretch. This systematic approach helps increase circulation, oxygenates tissues, and restores range of motion, making it a powerful tool for helping people get better and return to the activities they love.
How to Perform AIS for Hip Flexors
- Set Up: Lie on your back on a firm surface, like a physical therapy table or the floor. One leg should be straight, while the other will be the focus of the stretch. You may need a stretching strap or rope.
- Position the Strap: Place the strap around the foot of the leg you intend to stretch. Hold the ends of the strap with your hands.
- Initiate the Movement: Actively lift your leg toward the ceiling as far as you can without assistance. This initial movement is key to the "active" part of the stretch.
- Apply Gentle Assistance: Once you reach your maximum active range, gently pull on the strap to guide the leg a little further into the stretch. The assistance should be light and brief.
- Hold and Release: Hold this assisted stretch for only two seconds. Then, release the tension and return your leg to the starting position.
- Repeat: Perform 8-10 repetitions on one side before switching to the other leg.
Key Insight: The magic of AIS is in the active contraction and the short hold. Actively contracting your glutes and hamstrings to lift your leg tells your hip flexors to "let go." The brief, gentle pull prevents your muscles from fighting back, allowing for real progress.
How Often Should You Do It?
For the best results, incorporate an AIS routine 2-3 times per week. Perform 1-2 sets of 8-10 repetitions on each leg. Because this method requires precision, it's often best to learn it from a qualified physical therapist, like those at Highbar Physical Therapy, who can ensure you are performing the movements correctly to live a fuller, better life.
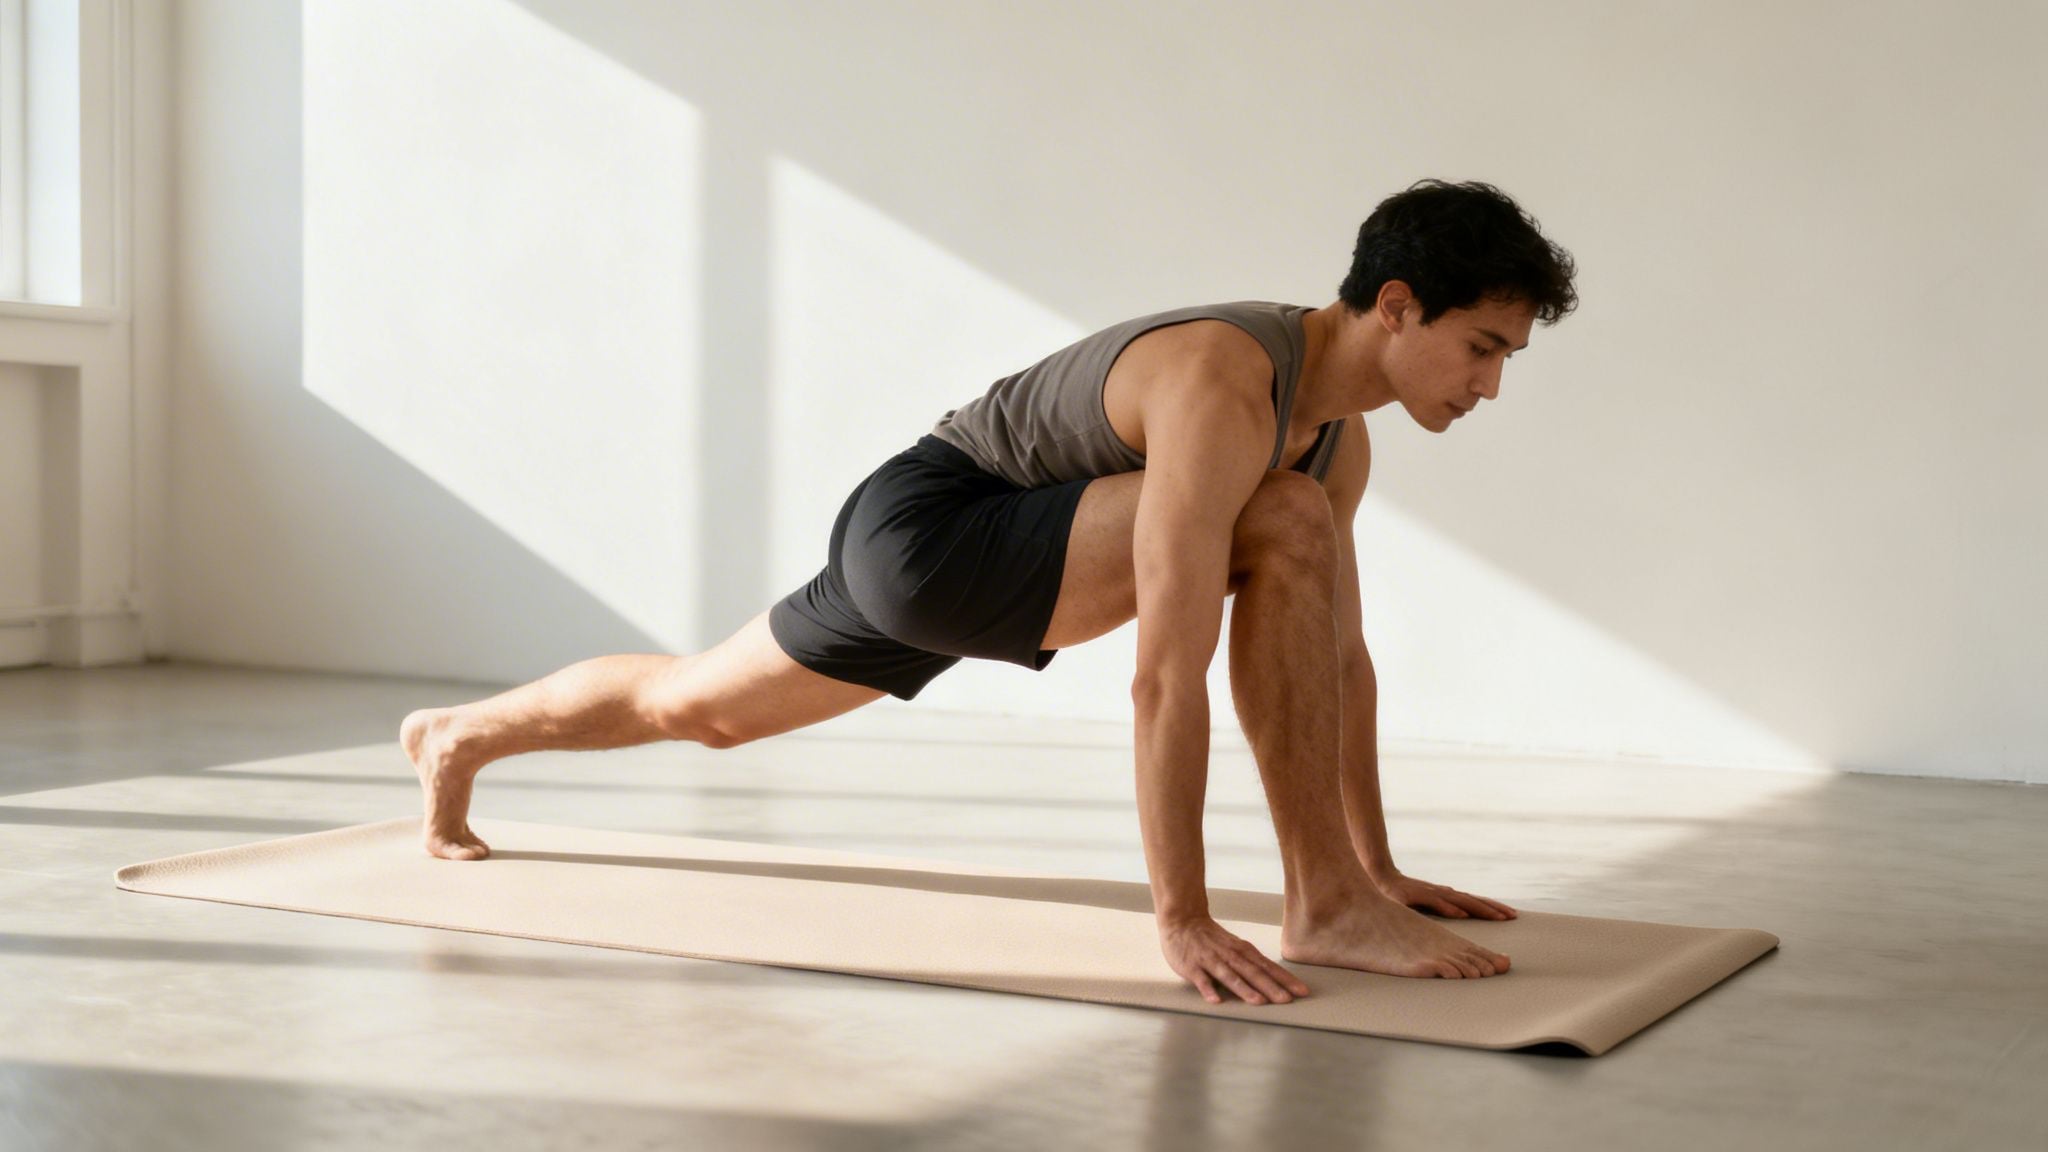
6. Dynamic Hip Flexor Mobilization (Walking Lunge Variations)
Dynamic Hip Flexor Mobilization moves away from static holds and introduces a functional, movement-based approach to stretching. This method uses variations of the walking lunge to actively move the hip through its full range of motion, which both stretches and strengthens the hip flexors. This technique is especially good for improving functional hip mobility, making it one of the best stretches for tight hip flexors for athletes and active individuals getting ready for activity.
Unlike a static stretch that holds a muscle in a lengthened position, this dynamic approach prepares the neuromuscular system for activity. It improves blood flow, raises muscle temperature, and activates the muscles that control hip extension. This is why it's a staple in warm-up routines for runners, weekend athletes, and anyone about to exercise. It effectively bridges the gap between passive flexibility and active, usable mobility, helping you move more efficiently and with greater power.
How to Perform a Walking Lunge for Hip Flexor Mobilization
- Get into Position: Stand with your feet together, keeping your chest up and your core engaged.
- Step Forward into a Lunge: Take a large step forward with one leg. Lower your hips until both knees are bent at approximately a 90-degree angle.
- Find the Stretch: As you lower, your front knee should be directly over your ankle. Focus on feeling a stretch at the front of your back hip. Maintain an upright torso; avoid leaning forward.
- Drive Through and Alternate: Push off your back foot and bring it forward to step directly into the next lunge with the opposite leg. Continue this walking pattern.
- Maintain Form: Keep the movement smooth and controlled. You can add a brief pause in the deepest part of the lunge to emphasize the stretch.
Key Insight: The goal is controlled movement, not just covering distance. A longer stride will deepen the stretch on the back leg's hip flexor. Focus on keeping your torso upright and your pelvis neutral to isolate the right muscles without straining your lower back.
How Often Should You Do It?
For a dynamic warm-up, perform 10-15 walking lunges per leg. Focus on quality of movement over speed. You can also incorporate other variations like reverse or lateral lunges to mobilize the hips in different planes of motion. Combining this dynamic work before activity with static stretches afterward provides a well-rounded approach to hip health. For more ideas, you can build a complete dynamic stretching routine to prepare your body for any workout.
7. PNF Stretching (Proprioceptive Neuromuscular Facilitation) for Hip Flexors
Proprioceptive Neuromuscular Facilitation, or PNF, is an advanced stretching technique that uses the body's own reflexes to produce deeper gains in flexibility. It is one of the most effective methods for lengthening chronically tight muscles and is considered a gold standard in physical therapy. Unlike a simple static stretch, PNF involves a sequence of passive stretching and active muscle contractions to inhibit the muscle's stretch reflex, allowing it to relax and lengthen more fully so you can feel better, faster.
This method is particularly powerful for stubborn hip flexors because it addresses the neurological components of muscle tightness, not just the physical shortening of muscle fibers. The "contract-relax" cycle essentially tells the nervous system it is safe to release tension, resulting in a greater range of motion. Because it requires precision and a partner, it is a technique you will often see in clinical settings like Highbar Physical Therapy, where our passionate therapists guide patients through the process to restore function after injury or surgery, helping them get back to living fuller lives.
How to Perform PNF for the Hip Flexors (with a Partner)
- Get into Position: Lie on your back on a firm surface, like a physical therapy table or the floor. Your partner will help you get into a passive hip flexor stretch, often by gently bringing one leg back off the side of the table or into extension on the floor.
- Passive Stretch: Your partner will move your leg to the point of a mild to moderate stretch in the front of your hip. Hold this position for about 15-30 seconds.
- Isometric Contraction: You will then gently contract your hip flexor by trying to pull your knee toward your chest while your partner provides resistance, preventing any movement. The contraction should be at about 75% of your maximum effort and held for 6 seconds.
- Relax and Deepen the Stretch: After the contraction, completely relax. Your partner will then carefully move your leg into a deeper stretch as your hip flexors release. This new position is held for 30 seconds.
- Repeat: This cycle should be repeated 2-3 times for each leg.
Key Insight: Communication is critical. You must provide clear feedback to your partner about the intensity of the stretch and any discomfort. This method is powerful and should never be pushed into the point of sharp pain.
How Often Should You Do It?
Due to its intensity, PNF stretching is typically performed 2-3 times per week on non-consecutive days to allow for muscle recovery. It is essential to work with a qualified physical therapist or certified trainer, especially when you are new to the technique. They can ensure proper form, apply the correct amount of force, and help you get the most out of one of the very best stretches for tight hip flexors available.
8. Foam Rolling and Self-Myofascial Release for Hip Flexors
While traditional stretching lengthens muscle fibers, foam rolling offers a complementary approach known as self-myofascial release (SMR). This technique uses a foam roller to apply direct, sustained pressure to your hip flexor muscles and the surrounding connective tissue (fascia). Think of it as a self-massage that can help break up fascial restrictions, reduce trigger points, and improve overall tissue quality before you even begin to stretch.
This method is especially effective for muscles like the rectus femoris and tensor fasciae latae (TFL), which can become dense with adhesions from overuse or prolonged sitting. By first "un-glueing" these tissues with a roller, you prepare them for more effective lengthening during active stretches. Its widespread adoption in physical therapy clinics and home exercise programs shows its value in preparing the body for movement and aiding recovery, making it a key component of a complete mobility routine for a fuller, better life. If you want a deeper look at the a foam roller, you can explore the benefits and uses of foam rollers for a full-body approach.
How to Perform Foam Rolling for Hip Flexors
- Get into Position: Lie face down and place the foam roller horizontally under the front of your hip. Support your upper body on your forearms, similar to a plank position.
- Target the Muscle: Extend the leg you are rolling and use your other leg (bent at the knee) to help control your movement and pressure.
- Initiate the Roll: Slowly shift your body weight to roll down the front of your thigh, moving from the bony point of your hip down towards the top of your knee. Avoid rolling directly over your hip bone or kneecap.
- Find and Hold: As you roll, search for tender spots or "trigger points." When you find one, pause and hold pressure on it for 15-30 seconds, breathing deeply until you feel the tension begin to release.
- Roll and Repeat: Continue this slow, controlled rolling for a total of 60-90 seconds. To target the TFL, slightly rotate your body to roll along the front, outer portion of your hip (where your front pocket would be).
Key Insight: The goal isn't to roll as fast or as hard as possible. Slow, controlled movements with sustained pressure on tight spots are far more effective for releasing fascial adhesions. Think of it as melting the tension away, not just ironing it out.
How Often Should You Do It?
Perform this technique for 60-90 seconds on each side before a stretching session or workout. You can also use it after activity or at the end of the day to help reduce muscle soreness. For the best results, follow up your foam rolling with one of the active stretches from this list to take advantage of the muscle's newly improved pliability.
Top 8 Hip Flexor Stretches Comparison
| Technique | Implementation complexity | Resource requirements | Expected outcomes | Ideal use cases | Key advantages |
|---|---|---|---|---|---|
| 90/90 Hip Flexor Stretch | Low–moderate — simple positioning, attention to spine | None or mat | Improved hip flexor length and general mobility | Office workers, basic rehab, daily mobility routines | Accessible, multi-muscle stretch, easily modified |
| Kneeling Hip Flexor Stretch (Half‑Kneeling Lunge) | Low–moderate — requires balance and alignment | Mat/padding for knee | Deeper anterior hip stretch with core engagement | Runners, athletes, functional rehab progressions | Functional carryover, unilateral assessment, progressive |
| Pigeon Pose (Eka Pada Prep) | Moderate–high — requires hip rotation and body awareness | Mat; bench/elevation optional | Improved external rotation, piriformis and posterior hip mobility | Yoga practice, posterior hip/piriformis issues (with caution) | Targets external rotators, comprehensive hip mobility |
| Couch Stretch (Elevation) | Moderate — needs spinal control and proper setup | Elevated surface (couch/bench), padding | Significant hip extension gains and deep rectus femoris stretch | Athletes with pronounced hip flexor tightness, mobility-focused training | Very deep anterior chain stretch, adjustable intensity |
| Active Isolated Stretching (AIS) | Moderate–high — technique-dependent, requires timing | Minimal; teacher/therapist recommended initially | Gradual ROM gains with reduced stretch reflex | Athletes, evidence‑based rehab, warm‑up protocols | Research-supported, safe for warm-ups, reduces guarding |
| Dynamic Hip Flexor Mobilization (Walking Lunges) | Low–moderate — coordination and endurance needed | Space; optional weights | Functional mobility improvement plus strength and stability | Warm-ups, sport prep, functional rehab | Combines mobility with strength; improves proprioception |
| PNF Stretching for Hip Flexors | High — technical protocol often needs a partner | Trained partner or therapist | Rapid and significant ROM gains when done correctly | Advanced rehab, athletes, overcoming flexibility plateaus | Most effective for fast gains; neuromuscular benefits |
| Foam Rolling / Self‑Myofascial Release | Low — simple to perform but requires technique | Foam roller (various densities) | Improved tissue quality, reduced trigger points, pain modulation | Daily self‑care, pre/post activity, office workers | Accessible self‑treatment, addresses fascial restrictions |
From Stretching to Strength: Your Next Steps with Highbar Physical Therapy
You now have a detailed toolkit of the best stretches for tight hip flexors, from the foundational Kneeling Lunge to advanced PNF techniques. Mastering these movements is a significant first step toward reclaiming mobility and easing discomfort. Consistently applying these stretches can counteract the effects of prolonged sitting, improve your posture, and enhance athletic performance by allowing your hips to move through their full, intended range of motion.
The key takeaway is that effective stretching is about intention and precision, not just intensity. Remember to engage your core, maintain a neutral pelvis, and breathe deeply into each stretch. Paying close attention to the form details we’ve covered, like squeezing the glute of the stretching leg, will ensure you target the psoas and iliacus muscles directly, rather than compensating with your lower back. This mindful approach prevents injury and produces far better results than simply pushing into a position that feels tight.
Why Stretching Is Only Part of the Solution
While the stretches in this guide are powerful, it's critical to understand that stretching alone is often a temporary fix. Chronic hip flexor tightness is rarely just a case of "short" muscles. More often, it’s a symptom of a deeper imbalance.
Consider these common underlying causes:
- Weak Glutes: Your glutes are the primary hip extensors, working in opposition to your hip flexors. If they are weak or inactive, your hip flexors may become overactive and "tight" to compensate and provide stability for the pelvis.
- A Disengaged Core: The muscles of your core, including your deep abdominals and obliques, work to stabilize your pelvis and lumbar spine. When the core is weak, the hip flexors (especially the psoas, which attaches to the lumbar spine) often take on a stabilizing role they aren't designed for, leading to a state of constant tension.
- Poor Postural Habits: Habitual anterior pelvic tilt, where the front of the pelvis drops and the back rises, puts the hip flexors in a constantly shortened position. Stretching provides temporary relief, but until the postural pattern is corrected through strengthening and awareness, the tightness will return.
This is why a truly effective program doesn't just stretch what's tight; it strengthens what's weak. Lasting relief comes from building a balanced, resilient system where every muscle group does its intended job. For those looking to integrate hip mobility work into a comprehensive fitness regimen, a Personalized strength training app can provide structured guidance to build that foundational strength.
When to Seek Professional Guidance from a Physical Therapist
If you've been diligently performing the best stretches for tight hip flexors without seeing lasting improvement, or if your tightness is accompanied by sharp pain, clicking, or nerve-like symptoms (numbness, tingling), it’s time to consult an expert. These can be signs that a more complex issue is at play, such as a labral tear, hip impingement, or nerve entrapment, which stretching alone cannot resolve.
This is where the specialized knowledge of a physical therapist becomes invaluable. At Highbar Physical Therapy, we see beyond the symptom of "tight hips." We conduct a thorough diagnostic evaluation to pinpoint the root cause of your discomfort, assessing your movement patterns, joint mobility, and muscle strength. This commitment to expert diagnosis and personalized care is driven by our passion for helping people get better.
Your personalized treatment plan will extend far beyond simple stretches. It will likely include:
- Manual Therapy: Hands-on techniques to improve joint mobility and release soft tissue restrictions that you can't address on your own.
- Targeted Strengthening: Specific exercises to activate and build strength in your glutes, core, and other supporting musculature.
- Neuromuscular Re-education: Training your brain and muscles to work together in more efficient patterns, correcting the habits that led to the tightness in the first place.
Our passion is helping you get better so you can live a fuller, more active life. We don’t just want to relieve your pain; we want to give you the strength, knowledge, and confidence to move freely and prevent the issue from coming back. Don't let hip tightness dictate what you can and can't do. Take the next step toward a permanent solution.
Ready to move beyond temporary relief and address the root cause of your hip tightness? The expert team at Highbar Physical Therapy is here to create a personalized plan that gets you back to living a full, active life. Schedule your appointment today and discover what it feels like to move freely and without pain.